My Scripting Workflow

Introduction

A while ago, I described my switch to a new scripting workflow. That article explained to my customers why I was re-releasing a lot of my products with no functional change, and that due to my changed workflow, solving bugs they might encounter could be slower than was previously the case.

This article is for my SL scripter colleagues.  It lays out in precise detail just how my scripting workflow works, and includes a functional makefile and bash scripts to implement it.

Required Software

I use Linux (specifically Ubuntu) as my operating system of choice.  You will need the following software installed to implement this workflow.

  • Mercurial
  • GNU Make
  • GCC
  • Firestorm
  • LSL-PyOptimizer
  • Python
  • TortoiseHG (optional)

All my LSL projects are in Mercurial repositories, one repo per project.  Yes, yes, I know that the world seems hellbent on standardizing on Git, but 1) I’ve been using Mercurial forever, and 2) Git is far more complex that it needs to be for a single developer.  If you prefer Git (or some other VCS), feel free to take what follows and replace the hg commands.

LSL-PyOptimizer and the GNU Make utility are also a crucial part of this workflow, as is the Firestorm Preprocessor.

If you’re a scripter and unaware of LSL-PyOptimizer, you’re missing out.  This program, written in Python, takes your LSL as input and spits out LSL that is memory optimized.  Depending on your script, you can save large percentages of your original memory footprint by using this utility.  LSL-PyOptimizer also supports some sorely missed features in the LSL language, which can make coding easier and the end result more readable.  Get it, use it.

One note on LSL-PyOptimizer.  As the package is delivered, the main python script is called main.py, which is not very useful.  I copy main.py to lslpo and include the directory in my path so I can invoke it with a non-generic name.  Additionally, if you are running Python3 (which you should be in this day and age), you need to change the hash bang at the start of the file to remove the trailing “2” from “Python2”.

Python is required to run LSL-PyOptimizer.

GNU Make is a dependency build system.  You write instructions to tell Make how to build your project.  Because LSL-PyOptimizer recognizes most C preprocessor directives, and LSL is C-like syntax, you can use the GCC Preprocessor to automatically build dependencies for you, which Make will then use to build your project.  Make will also be responsible for automatically generating a version number for the resultant code (based on Mercurial tags).

Using Firestorm enables you to use its preprocessor so you can #include files.  The output of LSL-PyOptimizer will be included in its entirety to eliminate the need of copy/pasting from a file on your PC to the edit window in SL.

TortoiseHG is a graphical user interface to Mercurial.  In the following, I will use the Mercurial command line interface, but normally I will use TortoiseHG to manage my repos.

Step by Step

The easiest way to demonstrate this workflow is to work a real example, and additionally it can work as a test to see if you have everything set up correctly.  Let’s create a dead simple project from scratch, assuming nothing exists.


$ cd ~
$ mkdir src           # Standard source directory
$ cd src
$ mkdir include       # Dir containing included scripts
$ mkdir script        # We will place a supporting bash script here
$ mkdir test          # The name of our test project
$ hg init test        # Initialize the project dir as a Mercurial repo
$ cd test
$ mkdir Script        # This is where our original LSL will live
$ mkdir build         # This is where the LSL-PyOptimizer output will end up
$ mkdir stable        # This is where the current release code will end up

This sets up a source directory (/home/username/src/ is the defacto source directory name on Linux, and the makefile assumes that’s where it is). It also sets up a directory to contain included files such as debug.lsl, which I include in every LSL script I write. And finally it creates the basic structure for a project called “test” and initializes it as a Mercurial repository.

To follow along, visit the source for debug.lsl, copy and paste it into ~/src/include/debug.lsl

Now let’s create a basic LSL script in ~/src/test/Script/test.lsl.


#define DEBUG
#include "debug.lsl"

default {

    state_entry () {
        llSetObjectDesc (VERSION);
        llOwnerSay ("State_entry");
        debug ("Done");
    }
}

We initialized the test directory as a Mercurial repository already, so we can just add our new script as a tracked file and commit our changes. If you haven’t set a username for Mercurial, it will complain about that. Just follow its instructions to correct the issue.


$ hg add Script/test.lsl
$ hg commit -m 'Initial version'

And now the makefile. Even though a copy of this needs be in the project directory, they are not project specific, so when you create a new project you can just copy an existing makefile to the new project’s directory. I’ll list it out here and you can copy and paste it into ~/src/test/makefile


BUILD_DIR := ./build
SRC_DIR := Script/
INC_DIR := $${HOME}/src/include/

SRCS := $(shell find $(SRC_DIR) -not -path '*/.*' -name '*.lsl' -printf '%f\n')

OBJS := $(SRCS:.lsl=.olsl)
OBJS := $(OBJS:%=$(BUILD_DIR)/%)
DEPS := $(OBJS:.olsl=.d)

VERSION := $(shell bash $${HOME}/src/script/version.sh)

.PHONY: all
all: $(DEPS) $(OBJS)

$(BUILD_DIR)/%.d: $(SRC_DIR)%.lsl
	@echo "Rebuild" $@
	@mkdir -p $(dir $@)
	@set -e; rm -f $@; \
	cpp -MM -nostdinc -iquote$(INC_DIR) -iquote$(dir $(abspath $@)) $< > $@.$$$$; \
	sed 's,\($*\)\.o[ :]*,$(BUILD_DIR)/\1.olsl $@ : ,g' < $@.$$$$ > $@; \
	rm -f $@.$$$$

include $(DEPS)

$(BUILD_DIR)/%.olsl: $(SRC_DIR)%.lsl version.txt
	@echo "Rebuild" $@
	@mkdir -p $(dir $@)
	@lslpo \
                --preproc=gcpp \
	        --postarg='-DVERSION="$(VERSION)"' \
                --postarg="-nostdinc" \
		--postarg="-iquote$(INC_DIR)" \
		--postarg="-iquote$(dir $(abspath $<))" \
		--timestamp \
		$< -o $@

.PHONY: clean
clean:
	rm -rf $(BUILD_DIR)

STABLE_DIR := ./stable

.PHONY: stable
stable:
	mkdir -p $(STABLE_DIR)
	rm -f $(STABLE_DIR)/*.olsl
	cp $(BUILD_DIR)/*.olsl $(STABLE_DIR)

The makefile executes a bash script to automatically generate a version based on the last Mercurial tag in the repo of the form “VM.m”, which M is the major version and m is the minor version. For example, V1.0.

The script also appends a patch number to the version string if there are committed changes to the working directory after the last tag. For example, if the last tag is “V1.0”, and there are 5 commits after that tag (not including the commit that created/moved the tag), then the generated version will be “V1.0.5”. If there are no tags in the repo, the version number will start at “V0.1”.

Here’s the bash script. Copy and paste this to ~/src/script/version.sh.


#!/bin/bash
if [ ! -f version.txt ]
then
    echo "V0.1" > version.txt
fi
FILE_VERSION=$(<version.txt)
REGEX="re:^(V\d+\.)?(\d)$"
VERSION=$(hg log -r "." --template "{latesttag('$REGEX')}")
CHANGES=$(hg log -r ". and not keyword('added tag')" --template "{changessincelatesttag}")
CHANGES=$(($CHANGES-1))

if [ ${VERSION} == 'null' ]
then
    VERSION="V0.1"
    CHANGES=$(hg log -r "." --template "{rev}")
fi

PLUS=""
if [ $CHANGES -gt 0 ]
then
    PLUS="."$CHANGES
fi

if [ $FILE_VERSION != $VERSION$PLUS ]
then
    echo $VERSION$PLUS > version.txt
fi

echo "$VERSION$PLUS"

With all of this in place, we can finally run the make command to build the project.


$ make
Rebuild build/test.d
Rebuild build/test.olsl
$ ls build/
test.d  test.olsl
$ cat build/test.d
./build/test.olsl build/test.d : Script/test.lsl /home/blue/src/include/debug.lsl
$ cat build/test.olsl
// Generated on 2024-11-17T19:51:03.056390Z
debug(string text)
{
    llOwnerSay(text);
}

default
{
    state_entry()
    {
        llSetObjectDesc("V0.1");
        llOwnerSay("State_entry");
        debug("Done");
    }
}

Note that in the dependency description file test.d, the build targets not only depend on the LSL in the Script directory, but also debug.lsl in our include directory. This means that if we ever change debug.lsl, make will rebuild the project for us.

Also note that because we didn’t add a version tag to the repo, we get the default version of V0.1 in the generated code. Let’s fix that.


$ hg tag V1.0
$ touch Script/test.lsl    # Force make to rebuild even though the code didn't change
$ make
Rebuild build/test.d
Rebuild build/test.olsl
$ cat build/test.olsl
// Generated on 2024-11-17T20:12:33.719787Z
debug(string text)
{
    llOwnerSay(text);
}

default
{
    state_entry()
    {
        llSetObjectDesc("V1.0");
        llOwnerSay("State_entry");
        debug("Done");
    }
}

The makefile has a stable target too. It simply copies the generated LSL currently in the build directory to the stable directory. When I tag a changeset as a release version, I’ll simply run this.


$ make stable
mkdir -p ./stable
rm -f ./stable/*.olsl
cp ./build/*.olsl ./stable
$

Lastly, the repo is a bit of a mess.


$ hg status
? build/test.d
? build/test.olsl
? makefile
? stable/test.olsl
? version.txt

You can choose how to deal with untracked files to suit your style. I use an .hgingore file that contains the following standard lines.


$ cat .hgignore
syntax: glob
.DS_Store
build/**
stable/**
version.txt
makefile

And we should add .hgignore as a tracked file and move our tag to the last changeset (or tag with V1.1 if you prefer).


$ hg add .hgignore
$ hg commit -m 'Track .hgignore'
$ hg tag -f V1.0

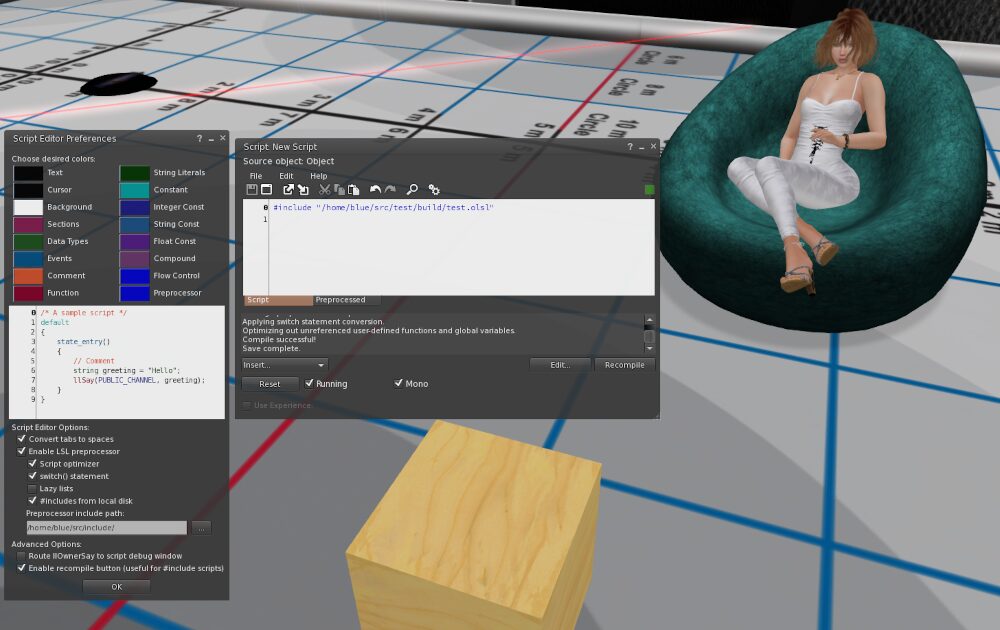
All this work has so far been done on our PC. As I’m developing/testing the script, to get the results in-world, I will create a script in the target object that looks like this.


#include "/home/blue/src/test/build/test.olsl"

Note you need to enable the Firestorm preprocessor in the scripts editor window settings panel to do this.

Once I’m happy with a release and copy the generated code to the stable directory, the production version of the product will have the include path changed from “build” to “stable”.

Conclusion

It can take a little while to get used to editing the script on your PC, issuing the make command, and then switching to SL and hitting the “Recompile” button in the script editor, but it’s worth it.  Everything is tracked, every version is labeled, and you get memory optimized code, and automatic versioning so you never have to guess which version of script is in the twenty different copies of the object you generated while testing 🙂

I hope this helps some of you manage your code better. If you have questions or comments about any of this, feel free to email me or contact me in-world, or leave a comment here on the blog.

Script memory

Thinking about script memory in LSL is very important.  In Mono, which is the modern script engine, each script gets 64K of memory allocated by default.  This is true even if the script uses only a few kilobytes of memory.

With thousands of scripts in a region, this can easily consume all the memory allocated to the region, and cause the region to start swapping memory out to disk (this all happens at the Linden Lab server running the region).  Swapping is a Bad Thing™ and will drastically slow down the sim, which you’ll see as lag.

So, what as script creators can we do?  If you have a script that takes no external input, you can limit the amount of memory your script will be allocated with a llSetMemoryLimit () function call.

Firstly, what do I mean by “takes no external input”?  An example of something that takes external input is something like a picture frame that displays the owner’s selection of textures.  The owner can drag textures into the frame and display them.  Typically to do this, the script will load the names of the textures into a list, and therefore the amount of memory used by the list is out of the control of the script creator.  It depends on how many textures the owner loads into the frame’s contents, and not how the script creator codes the script.

So, if you have something that doesn’t allocate memory out of your control, how do you know what upper limit to set with your call to llSetMemoryLimit ()?  There’s a set of memory profiling calls that will tell you.  And, as you may have guessed, this post was prompted by someone triggering the swapping problem on my home sim, which made me see if I could drop the memory that my scripts allocate.

To make things easy, I created an include file for my scripts.  Let me show you an example of how I use it.  You can access the included files by following the link in the comments next to them.

#define DEBUG
#include "debug.lsl"      // See the source of debug.lsl

#define MEMLIMIT 8000
#define PROFILE
#include "profile.lsl"    // See the source of profile.lsl

#define BLUE "c3623b1f-db83-4003-bb6d-d0d60d32c621"

phantom (integer p) {
    llSetLinkPrimitiveParamsFast (LINK_THIS, [PRIM_PHANTOM, p]);
}

default {
    state_entry () {
        init_profile ();
        llCollisionFilter ("", BLUE, TRUE);
        phantom (FALSE);
    }

    collision_start (integer n) {
        phantom (TRUE);
        llSetTimerEvent (2.0);
    }
    
    timer () {
        llSetTimerEvent (0.0);
        phantom (FALSE);
        show_profile ("timer");
    }
}

This is a simple script that goes in an invisible barrier.  It lets me walk through it by turning the barrier phantom when I collide with it, but for everyone else, it does nothing.  It takes no external input, all the memory it will use is its code, it doesn’t even use any variables!  So this is a perfect candidate for limiting script memory allocation.

The code at the top includes my standard debugging code, and the

#define MEMLIMIT 8000
#define PROFILE
#include "profile.lsl"

defines an initial memory limit of 8000 bytes, tells profile.lsl to enable profiling, and includes the profiling code.

Now notice the calls to init_profile () and show_profile ().  The init_profile () call sets the script’s memory limit based on the MEMLIMIT definition, and starts memory profiling if PROFILE is defined (and, just a warning here, memory profiling can drastically slow down your script so make sure you turn it off when done!)

The show_profile () call displays the current maximum amount of memory the script has used.  It can be tricky to figure out where to put this call, but in this case, it’s easy, as the script flow first sets everything up and then waits for a collision by me, followed by the timer firing.  So the logical place to put the show_profile () call is at the end of the timer.  All the code has run by this stage.

When you save this, and collide with it (if you’re trying this, don’t forget to replace my UUID with yours!), you’ll see something similar to the following…

Barrier: Memory profile init: 0
Barrier: Memory profile show (timer): 7598

This tells us that at the end of the timer event, the most memory the script has ever used is 7598 bytes, so our starting figure of 8000 was close.  If you see

Barrier: MEMLIMIT = 8000 too small

increase the size of MEMLIMIT until this message goes away.

I will leave a little buffer between the size reported and the limit, just in case 🙂  So in my example, I left MEMLIMIT at 8000.  Doing this simple exercise saved over 56K!  That may not sound like a lot, but don’t forget there can be thousands of scripts running in a region, so it adds up.

Once you’ve figured out a good number for MEMLIMIT, don’t forget to turn off debugging and profiling by changing the #define DEBUG and #define PROFILE to #undef DEBUG and #undef PROFILE, and leave the init_profile () and show_profile () calls in place.  The init_profile () call just sets the memory limit when PROFILE is undefined (and the show_profile () call is replaced by a blank line of code).

If every script creator did this, we’d be living much less laggy second lives!


Basic animation chooser

Sometimes, you just need something simple to pick an animation to play.  Here’s a script to do just that.  Rez a prim, drop this script in it, and a bunch of animations, then take and wear it as a HUD.

When you touch it, it will offer you a dialog where you can play any of the animations, or stop the one currently playing.

Note the links to the included scripts.  If you don’t use the Firestorm preprocessor, you can get the source for the #included bits by following the link in the comment next to the #include.  Just cut and paste the code into the top of this script, replacing the #include.

#include "dialog_plus.lsl"  // see the source of dialog_plus.lsl
#include "privchan.lsl"     // see the source of privchan.lsl

integer g_have_perms;
string g_current;
list g_animations;
key g_owner;
integer g_channel;
integer g_listen_handle;
string g_msg = "Select";

default {
    
    attach (key id) {
        if (id != NULL_KEY) {
            llResetScript ();
        } else {
            if (g_have_perms && g_current != "") {
                llStopAnimation (g_current);
            }
        }
    }

    state_entry () {
        integer n = llGetInventoryNumber (INVENTORY_ANIMATION);
        integer i;
        string name;
        g_current = "";
        g_animations = ["Stop"];
        g_have_perms = FALSE;
        g_owner = llGetOwner ();
        g_channel = privchan ();
        for (i = 0; i < n; i++) { 
            name = llGetInventoryName (INVENTORY_ANIMATION, i);
            if (llStringLength (name) > 24) {
                llOwnerSay ("Animation \"" + name + "\" longer than 24 chars, not loaded");
            } else {
                g_animations += name;
            }
        }
        llRequestPermissions (g_owner, PERMISSION_TRIGGER_ANIMATION);
    }
            
    run_time_permissions (integer p) {
        if (p & PERMISSION_TRIGGER_ANIMATION) {
            g_have_perms = TRUE;
        }
    }
    
    touch_start(integer total_number) {
        llListenRemove (g_listen_handle);
        g_listen_handle = llListen (g_channel, "", g_owner, "");
        DialogPlus (g_owner, g_msg, g_animations, g_channel, g_menu_idx = 0);
    }

    listen (integer chan, string name, key id, string data) {
        if (chan == g_channel) {
            if (data == "Back") {
                DialogPlus (g_owner, g_msg, g_animations, g_channel, --g_menu_idx);
            } else if (data == "Next") {
                DialogPlus (g_owner, g_msg, g_animations, g_channel, ++g_menu_idx);
            } else if (data == "Stop") {
                if (g_current != "" && g_have_perms) {
                    llListenRemove (g_listen_handle);
                    llStopAnimation (g_current);
                    g_current = "";
                }
            } else {
                if (g_have_perms) {
                    llListenRemove (g_listen_handle);
                    if (g_current != "") {
                        llStopAnimation (g_current);
                    }
                    g_current = data;
                    llStartAnimation (g_current);
                }
            }
        }
    }
}

Butterflies, part 2

Yesterday we talked about a script to add to some cheap copy mod butterflies available on the marketplace to prepare them for use in a rezzer.  Today, we’ll look at the rezzer script and how to put it all together.

Let’s jump in and look at the rezzer script right away.  All we are going to have to do is place this, an optional notecard, and our modified butterflies in a prim, and we’ll be ready to go!  Here’s the script (don’t panic, it’s a little larger than yesterdays!):


integer g_rezzed;
integer g_chan = -88503;
integer g_nc_line;
integer g_rez_count;
integer g_pos_count;
integer g_obj_count;
key g_nc_id;
list g_positions;
list g_objects;
string g_nc_name = "config";

default {
    
    on_rez (integer n) {
        llResetScript ();
    }
    
    changed (integer c) {
        if (c & CHANGED_INVENTORY || c & CHANGED_REGION_START) {
            llResetScript ();
        }
    }
    
    state_entry () {
        llRegionSay (g_chan, "SWAT!");
        integer i;
        g_objects = [];
        g_positions = [];
        g_pos_count = 0;
        string name;
        integer n = llGetInventoryNumber (INVENTORY_OBJECT);
        for (i = 0; i < n; i++) { 
            name = llGetInventoryName (INVENTORY_OBJECT, i);
            if (llGetSubString (name, 0, -2) == "butterflys") {
                g_objects += name;
            }
        }
        g_obj_count = llGetListLength (g_objects);
        if (g_obj_count == 0) {
            llOwnerSay ("There are no butterflys objects in the inventory!");
            return;
        }
        g_rezzed = FALSE;
        g_nc_line = 0;
        if (llGetInventoryType (g_nc_name) == INVENTORY_NOTECARD) {
            g_nc_id = llGetNotecardLine (g_nc_name, g_nc_line);
        } else {
            llSetTimerEvent (30.0);
        }
    }

    dataserver (key id, string data) {
        if (id == g_nc_id) {
            if (data != EOF) {
                if (llGetSubString (data, 0, 0) != "#") {
                    g_positions += (vector)data;
                    llRegionSay (g_chan + g_nc_line, "SWAT!");
                }
                g_nc_id = llGetNotecardLine (g_nc_name, ++g_nc_line);
            } else {
                g_pos_count = llGetListLength (g_positions);
                llSetTimerEvent (30.0);
            }
        }
    }

    timer () {
        vector sun = llGetSunDirection ();
        if (sun.z > 0) {
            if (g_rezzed == FALSE) {
                integer i;
                for (i = 0; i < g_pos_count + 1; i++) {
                    llRezObject (llList2String (g_objects, (integer)llFrand (g_obj_count)),
                                 llGetPos () + <0.0, 0.0, 1.5>,
                                 ZERO_VECTOR,
                                 ZERO_ROTATION,
                                 g_chan + i);
                    g_rez_count++;
                }
                g_rezzed = TRUE;
            }
        } else {
            if (g_rezzed == TRUE) {
                integer i;
                for (i = 0; i < g_pos_count + 1; i++) {
                    llRegionSay (g_chan + i, "SWAT!");
                }
                g_rezzed = FALSE;
            }
        }
    }

    object_rez (key id) {
        if (--g_rez_count > 0) {
            llSay (g_chan + g_rez_count - 1,
                   (string)llList2Vector (g_positions, g_rez_count - 1));
        }
    }
    
    touch_start (integer n) {
        if (g_rezzed == TRUE) {
            integer i;
            for (i = 0; i < g_pos_count + 1; i++) {
                llRegionSay (g_chan + i, "SWAT!");
            }
            g_rezzed = FALSE;
        }
    }
}


OMG you might be saying 🙂 Let’s take it slow, and go through this. I’ll describe each event handler, so hopefully you can grasp what’s going on.

  • on_rez – we are just restarting the script.
  • changed – we restart the script on a region restart so as to make sure we either rez or derez the butterflies.  We also restart if the inventory changes, which makes it easy to add lines to the notecard for additional butterflies .
  • state_entry – we initialize some variables, find the names of the butterfly objects in our inventory (remember, I said yesterday to name the butterfly objects “butterflys1”, “butterflys2”, and “butterflys3”?).  Then we start reading our notecard, which will transfer control to…
  • dataserver – which gets each line in our notecard, and stores the data in a variable called g_positions, and once we hit the end of the notecard, we start a 30 second timer.  We also derez any existing butterfly objects.
  • timer – here’s where all the work gets done.  Every 30 seconds, we check if the sun is up (indicated by the Z value of the sun’s position).  If the sun is up, and we haven’t rezzed any butterflies yet, rez a randomly selected butterfly object from our inventory 1.5 metres above the rezzer for each of the positions in our notecard.  If the sun is not up, say “SWAT!” to each of our rezzed butterflies on the channel they are listening on to delete them.  Note the last parameter of the llRezObject call.  It tells each butterfly object what channel to listen on (the parameter in the on_rez event of yesterday’s script).  Also note that the rez loop rezzes one additional butterfly object and leaves it above the rezzer.   This makes it easy if you just want one butterfly set.
  • object_rez – here we tell each newly rezzed butterfly object the position it should move to.
  • touch_start – just in case you need to reset everything, you can touch the rezzer to delete any existing butterflies.

We need an optional notecard in the rezzer’s contents called “config”.  It consists of lines containing positions in region co-ordinates where you want additional butterflies to be.  You can also comment out a line by putting a hash in the first column.  So you might have something like this:

# butterflies for woods
<104.3, 10.5, 26.0>
# for skybox
<218.5, 132.5, 2026.0>

After all that we better have a picture 🙂

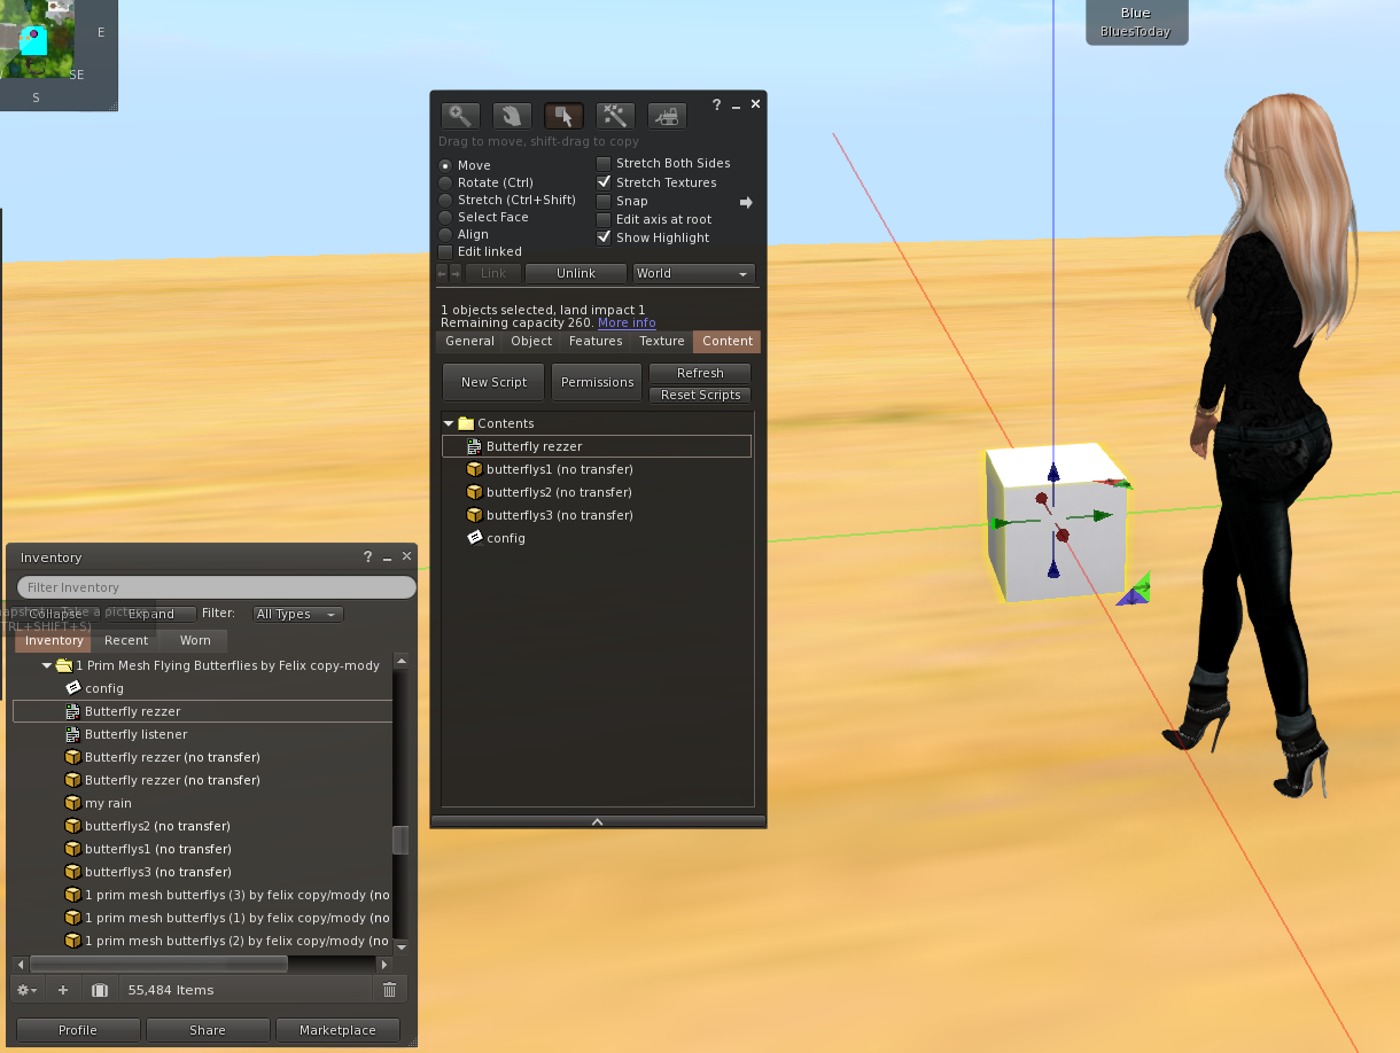
Here’s a screen shot of the rezzer with the config notecard, the above script, and the butterfly objects in its contents:

Here I’ve made the rezzer white so you can see it, but you should set it to 100% transparent, and phantom too.  You also must call the rezzer “Butterfly rezzer”, because that’s what our script from yesterday is expecting.

And that’s it!  If you’ve followed along with the instructions, 30 seconds after you drop the script in the rezzer, your butterflies should rez!  Assuming the sun is up 🙂  Take the rezzer into your inventory and position where you want one set of butterflies to be.  Add lines to the config notecard for additional ones!  Have fun!


Butterflies, part 1

Butterflies don’t fly at night, have you noticed?  Lots of builders just rez some and leave it at that.  Let’s see if we can get some realism.

I’ll wait while you go and buy some butterflies to play with from this marketplace listing.  They’re only L$10…

Got them?  Good.  Once you unbox them you will see they are copy, modify, no transfer.  This is exactly what we want as we can add scripts to them and rez them to our hearts content.

There are three different types in the box, and we are going to rez them one by one, add a script to them, and take them back into our inventory with a different name so we know which ones are ours.

Here’s the script we are going to add to them:

integer g_chan;

default {

    on_rez (integer chan) {
        g_chan = chan;
        llListen (chan, "Butterfly rezzer", NULL_KEY, "");
    }

    listen (integer chan, string name, key id, string msg) {
        if (chan == g_chan) {
            if (msg == "SWAT!") {
                llDie ();
            } else {
                llSetRegionPos ((vector)msg);
            }
        }
    }
}

Let’s examine what this does.  On rez, we get the integer that our rezzer passed us and listen to the rezzer on that channel.  When we receive a message from the rezzer, we delete ourselves if the message is “SWAT!”, else we interpret the message as a position in region co-ordinates and set our position there.  Pretty straightforward, right?

Create a new script in your inventory (probably in the folder you have the butterflies in) and call it something like “Butterfly listener”.  Then, rez each butterfly object, edit it, and drag the script into it.  Editing these can be a little tricky, so use area search to find and edit them.

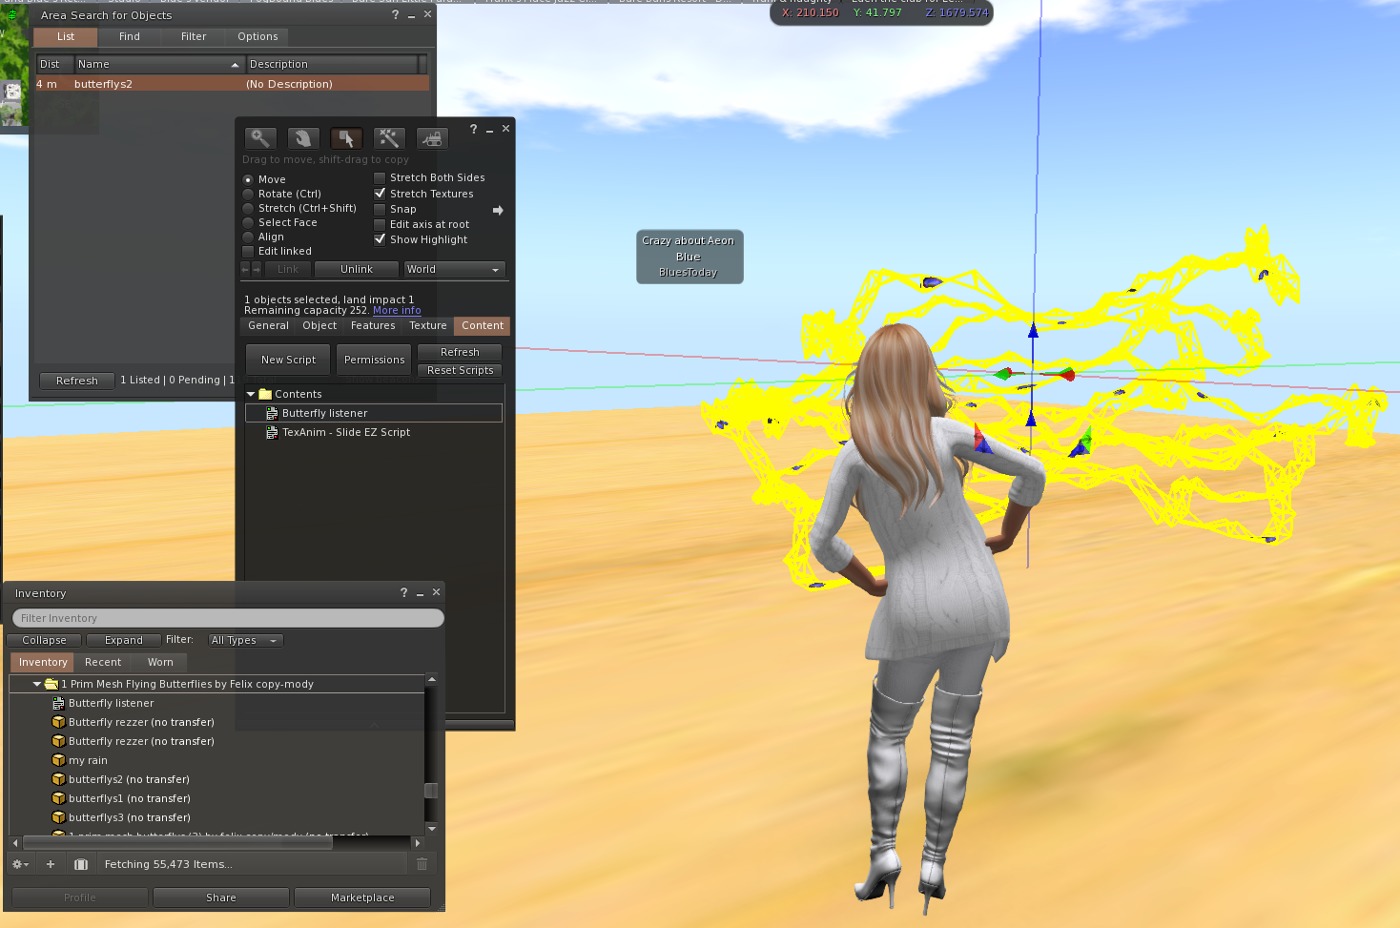
Here’s a screen shot showing one set of butterflies rezzed with the new script in them.

Name the butterfly objects “butterflys1”, “butterflys2”, and “butterflys3” either while you’re editing them or when you take them back into your inventory.  Note I’ve chosen to keep the creator’s spelling mistake as this makes them easier to find lol.  Note that all lower case is important!  If you don’t name them exactly this, tomorrow’s script won’t work.  You can see them in my inventory window in the above photo.

Tomorrow, we’ll examine the rezzer script, the control notecard, and how to put it all together.  Say tuned!